Eat More Pizza!
I’m totally into pizza as a form factor: it’s a great size and shape for better, cheaper, delicious breakfasts, brunches, lunches, dinners and desserts. You can put almost anything on it. When it comes straight from your own oven, it’s infinitely better than anything you can carry home or have delivered. And it’s kind of amazing to learn that you can make your own from scratch.
Go ahead, make a mess.
Is it easy? It’s so easy that it came out great the first time I made it, despite the distraction of shooting the video to document my virgin kneading. Is this a recommended activity for date night? Only if you like to get really sloppy together. Got kids? Think they’ll enjoy this?
Making Dough (as opposed to Rolling It Out)
Whether you make the dough from scratch or buy the frozen pre-made stuff, you’re gonna end up stretching and rolling out the dough into a thin pizza pie crust. Take a look at the Roll Your Own video (below) to see a rolling technique that works every time.
If you make your own, the only ingredients you need are flour, water, salt, yeast and olive oil. If you want to take the high-tech approach and avoid the messiest part of the process, you’ll need a food processor. If you don’t have one, just be prepared to wash your hands an extra time or two. Or not.
You Get What You Knead: Do It With Your Hands
If you take the totally hands-on approach I use in the above video, sift and combine in a large bowl: three cups of all-purpose flour with two teaspoons each of kosher salt and instant yeast. Add one cup of water and two tablespoons of olive oil. Stir it all together with a big wooden spoon.
When the mixture becomes too thick to stir – probably within a minute or so – just get in there with your hands and pull, push, fold and squeeze until you’ve kneaded the mass of formative dough to an even and soft consistency. It shouldn’t be dry; it shouldn’t be wet: it should be slightly sticky and elastic. After a few minutes, you may need to add a little water: do this a tablespoon at a time so you don’t produce a bowlful of wet, loose dough. How do you know when you don’t need to knead any more? Poke two fingers into the dough; when you remove your fingers, the indentations should remain. If it gradually pops back up – get back in there for a couple of minutes; then give it the poke test again. Watch the video at the top of this column to get a sense of what it’ll look like and how it behaves. And see that you can do this in less than ten minutes.
Always remember and never forget: this is Better Cheaper Slower – not Perfect Cheaper Slower. Don’t worry about your pizza dough: if you use these few simple ingredients and bake it in a really hot oven, it’ll taste good. So good that you’ll do it again and again – and you’ll have the opportunity to approach perfection in future pizzas.
How To Do It with a Food Processor
If you have a processor or mixer with a dough blade or paddle attachment, you can make the dough in one minute – literally. Put the flour (3 cups), salt and yeast (2 teaspoons each) in the bowl (no sifting necessary). Turn the machine on at the setting appropriate for dough; immediately pour in water (1 cup) and olive oil (2 tablespoons). Depending on your food processor, you’ll have a wad of dough spinning around in there in 30 – 60 seconds. My 11-cup Cuisinart “Prep Plus” actually has a dedicated “dough” button and setting; watch the video to see the ingredients transformed into dough in 30 seconds.
Give It a Rest
Whether or not you’ve used your hands to this point, the rest of the process is definitely hands-on. Lightly flour a work surface; then roll and lightly knead the dough into a large ball – this takes another few minutes. Then pour one tablespoon of olive oil into a bowl; roll your dough ball around for about 30 seconds in the oiled bowl, just enough to coat the dough. Cover the bowl and give your dough a rest and let it rise. In an hour or two, it should rise to about twice its size.
If you want to do all this messy stuff well in advance of making your pizzas, you can cover the bowl and put it in the refrigerator. In the cold, it will rise more slowly. So you can make dough in the evening and put it in the fridge overnight; or, do it in the morning so it’s ready by dinner time.
Either way, after the rise put the dough ball onto a lightly floured surface and, for a minute or two, knead and shape it into a reasonably round form. Cover it; let it rest for 20 minutes more.
Next, cut the approximately 1.5-pound dough ball into three equal pieces and knead/roll each of them into a smaller ball. Each 8-ounce ball is enough to make a thin-crust pizza that’s 10 – 12 inches in diameter. This’ll take a couple of minutes.
Now, you’re ready to roll out the dough. If you want just one or two pizzas, put the extra(s) in a freezer-proof container and stick it in your freezer for up to two weeks.
Ready to Roll 101
On a lightly floured surface and with lightly floured hands, shape the ball into a plump, round disc. With the heels of your hands, and then with your fingers, flatten and spread the dough until it’s at least five or six inches in diameter. You’ll be able to do this in a minute or two.
Then, with a heavy rolling pin, begin to roll it out from the center – once in each of four directions, then again and again in all directions. You’ll see that the dough is quite elastic; after each roll out, it contracts a bit. Eventually (in 3 – 5 minutes) you will have rolled it into submission – and into a 10 – 11-inch diameter crust that’s not more than 1/8-inch thick. Watch the video to see how easy and quick this is. (Note: it’s not going to be a perfect circle; it’s gonna be a cool-looking handmade pizza.)
Make Pizza!
Finally, you transfer your pizza dough onto the surface you bake or grill it on. In the best of all worlds, you have one of those big wooden paddles called “pizza peels”. If you do, cover it lightly with coarse cornmeal to prevent the dough from sticking to it; then lift or slide the flattened dough onto it. Use a big spatula to slide the dough from the paddle to the pizza stone that’s been pre-heating at least 45 minutes in your 550-degree (or hotter) oven.
No paddle, no stone? Use a large spatula and your hands and — very, very carefully — slide the dough onto a lightly oiled cookie sheet or other oven-ready flat surface. (I tried this on a pre-heated cast iron griddle and it worked fine – just be careful near the hot surface.) The trick is to keep the dough stretched out flat while preventing it from tearing or folding over onto itself.
If you’re grilling your pizza outdoors — which is a great thing to do — you really want to use a flat, perforated cooking surface. After messing up several pizza crusts by putting them directly onto the grill (the dough sags down into the gaps in the cooking grate), I invested $25 in a pizza grilling device that sits on top of the grill. It’s foolproof.
Put Something On It
Whether you’re using a 550-degree oven or an even hotter charcoal or wood grill, the crust bakes really fast (see the real time in-oven scene in the video). After one minute, check the underside of your crust; as soon as it begins to brown, remove it from the oven or grill. Flip it over – and assemble your topping(s) on the browned side. (Because what’s now the top side has been crisped, moisture from your toppings won’t make your pizza crust soggy.)
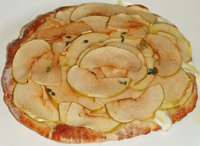
Put it back into the oven or onto the grill. Keep an eye on it; you’ll have a pizza in a very few minutes. In the video, I make an apple-cheddar-mozarella pizza that’s amazing for breakfast, brunch or dessert. Think of it as a fruit-and-cheese course in the shape of a pizza.
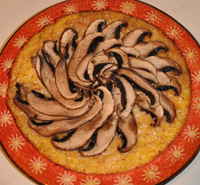
I’ll share many pizza recommendations in future Ways of the Day. I’m experimenting with a variety of toppings that go well with crusts made partly or entirely from whole grain wheat and corn flours. I’ll report results and recipes when they’re ready for prime time. Meanwhile, take a look at my polenta-portobello “pizza” (right).
You’ll have access to A New Way Every Day and the complete archive of all the Yesterdays when you Subscribe for an entire year – for $10.
Cost-Benefit Analysis
Roll your own . . .
Better Cheaper: 34 cents per 10” crust! My “recipe” makes three 8-ounce crusts for $1:
– 3 cups of flour = $.57
– 2 tblsp of olive oil = $.28
– 2 tsp of kosher salt = $.02
– 2 tsp of instant yeast = $.15
… or buy the frozen stuff?
Pillsbury’s 13.8-ounce package of frozen dough costs $2.50. That’s $1.25 for a 6.9-ounce crust vs. 34 cents for our 8-ounce crust. (Per ounce, the Dough Boy’s stuff costs 4 times more than homemade.) But the important difference is found in the list of ingredients. Their long list includes Dextrose, Sugar, Partially Hydrogenated Vegetable Oil (transfat), Glucono Delta-Lactone and Mono- and Diglycerides. I rest my dough.
It’s Always Something
If you shop and read the ingredients carefully, buying healthy, pre-made frozen or refrigerated dough for $1 -$2.50 per crust can still be a good deal because you can top it with better, cheaper, more healthy and delicious stuff than you can have delivered. Here in New York, I’ve used an expensive but high quality source for $2 per 8-ounce dough ball. Stores like Trader Joe’s and Whole Foods sell refrigerated pizza dough; so do some local pizza restaurants. You won’t have to make the dough, but you still have to roll it out and rest it.
Every Thing Is Everything
The calorie count for the flour and oil in each homemade pizza crust is about 480. The sugar added to most store bought pizza dough raises the number significantly.
When you make and roll your own, you’ll spend: 10 minutes mixing and kneading; 5 minutes shaping; and, 5 more minutes stretching, flattening and rolling. In these 20 minutes, you should burn about 80 calories. (Full disclosure: you’ll probably burn another 40 during the 10 minutes you spend cleaning up the mess you make the first time you try this.)
And … you have a great time. If you’re trying to get your kids and/or significant other into cooking and eating healthy foods, making pizza is as close as you get to a sure thing.
When you’ve become an experienced pizza practitioner and can knock these off while blindfolded, you’ll amaze and delight your friends and family with these light, delicious, beautiful and healthy creations.
This is really Better Cheaper Slower food.
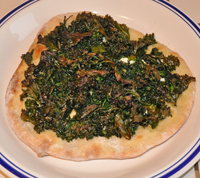
Kale Chip-Feta Cheese Pizza
It’s Always Something
If I were you, I’d definitely use this rolling pin technique to jump-start your pizza-making career. After you’ve done this enough times to feel like you’re, you know, one with your dough, you can try my Pizza Crust 102 – look ma, no rolling pin, all hands. You can make your own version of the world’s thinnest crust in less time than it takes with a rolling pin, but it takes some practice.